|
 
Mikado Logo 10
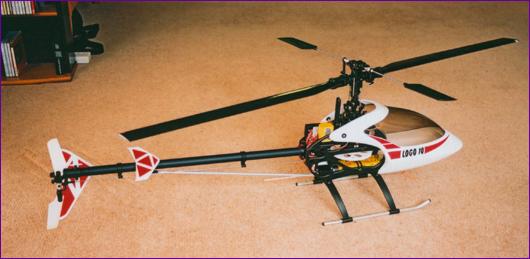
My only previous helicopter experience was with a secondhand Kyosho Concept EP, which logged 175 flights between 1993 and 1998. By the time it was pensioned off, I had just attempted my first circuits. Over the last couple of years, I had taken a passing interest in the developments in electric helicopters and, having read good reports of the JR Voyager and Eco 8, I felt the time had come to dip my toe in the whirlypool again.
I was still hesitating on the brink when I read about the Mikado Logo 10. Here was a helicopter capable of good hovering duration but also capable of taking me through the learning phase and, if it survived and I progressed enough, onto circuit flying, autorotations and aerobatic flight. Dream on! At a more practical level, one of the problems I found with the EP was disorientation when it got more than a few yards away. Compared to a fixed wing aircraft, there really is not a lot to look at on a model helicopter, yet it is capable of departing from a level attitude in any direction and needs instant correction from the pilot. In this respect the Logo 10 has the one great advantage over the Concept EP - it is bigger.
Because I had bought the EP secondhand, the Logo 10 was my first helicopter build, so if you want to know how it compares with its competitors, I suggest you do as I did and look up the various reviews on the web by more experienced helicopter builders. I can say though that the instructions were very clear and I encountered few difficulties in getting it together. I bought my Logo 10 complete with a set of 500mm symmetrical sectioned NHP composite blades, a tailboom steady, Kontronic motor and ESC, a 14 tooth motor pinion, a 14 cell 2400mah battery and a CSM 180 Piezo gyro. I then bought four JR 331 micro servos and a Multiplex IPD receiver. A few words on how some of these selections worked out might be in order.
Blades
Having read the various reviews, I had decided that I would stick with the wooden blades supplied with the kit. I then learned that the later kits had been changed. The good news is that they now include the autorotation hub as standard and the canopy is pre-assembled. However the helicopter now comes with no blades! The NHP blades were recommended by the dealer, and they turned out to be perfectly balanced, look very smart - and seem to work okay, too.
Motor, Pinion and ESC
This combination again was recommended by the dealer. The Smile speed controller has a number of modes of operation, including a helicopter mode. Once set up in this mode, it effectively acts as a governor. After connecting the battery, you simply advance a slider controller on your transmitter to a pre-marked position then stand back and watch the rotor wind itself up to the preset head speed. Of course, if you have left the collective stick in the wrong position, you will also witness the helicopter take off but, so far, I have managed not to do that! This is a very effective way of working and does away with all that messing about matching pitch and throttle curves in the quest for a constant head speed. In order to set the head speed, I rotated the rotor head one turn and observed that the tail rotor went round five times. Using the rev counter to set the tail rotor rpm to 7500 then gave me the desired head speed of 1500rpm. If you want to run the head faster, you are recommended to upgrade the rotor head with more ball races. However, the hover is very stable so I intend to stay within the 1500 limit for the forseeable future. With a 2400mah nicad battery, 7minutes of continuous hovering is the norm, by which time you can hear the rotor speed sagging.
Gyro
I was advised that investing in a heading lock gyro was not necessary unless I was contemplating advanced aerobatics. I therefore opted for the CSM 180 which is a good quality pilot authority rate gyro. This unit has been simple to set up (it only has one adjustment, for gain) and works reasonably well. I can't say that the tail is rock steady, but there is a bit of slop in the servo head which may be the limiting factor rather than the gyro.
Servos
The cutouts in the side frames are for micro servos (although there is an alternative position for a full size tail-rotor servo). However, the instructions call for large servo arms - up to 20mm in fact. How many micro servos come with arms that long?! The JR 331 servos were therefore chosen because they have the same splined output shaft as their full size counterparts, making it easier to obtain suitable sized arms. The Logo 10 recommends 120 degree swashplate mixing (although it will accommodate 90 degree mixing if you transmitter can't cope). The JR331s fitted neatly and seem to have enough power for the job. I might try an alternative sometime for the tailrotor though.
Receiver
All my receivers are PPM and, as an electric flyer, I am well used to the problems that can arise trying to decode the microvolts in the aerial wire just a few inches away from a high power electic motor and compex electronic switching circuits in the ESC. The Multiplex IPD receiver is claimed to be particularly good at coping with these problems and, since there is not really a lot of scope in a helicopter for moving things around, it seemed like a good opportunity to put the claim to the test. So far, it has been glitch-free.
Installation Matters
As mentioned earlier, the instructions are very clear and, by and large, I just did as I was told. I did though make a couple of changes:
Gyro location: The instructions say to mount the gyro down below, alongside the tailrotor servo. The CSM 180 is a bit bulky and didn't seem to fit too well in that position, so I put it behind the main shaft, alongside the receiver. The receiver battery went where the gyro was supposed to be.
Battery position and orientation: The flight battery slides in from the front and you are then told to switch on the radio, connect the battery and then fit the canopy. I didn't fancy grovelling around fitting the canopy with the motor live, so I slide the battery in connector end first, fit the canopy and then carry the model out to the flight line before switching on the radio and connecting the battery. The battery has to stick forward a long way in order to get the cg right. The end of the battery is supported by the canopy so it is important to have the battery in place when finalising the fit of the canopy.
Flying
Well, so far, so good. I was quite shocked to find how rusty I was after a four year lay off. It really was like learning all over again. However, whereas the Concept EP always seemed happiest a foot or two above the ground and looked insecure and vulnerable any higher, I was soon happy to take the Logo 10 above head height. The extra size not only helps orientation but also seems to give the model a much more steady and secure feel. It's going to be a while before I start trying circuits again though!
 
|
|