|
  
Mini IFO
kit review by Trevor Hewson
(originally published in Sloping Off, December 2000)
What is That?
Okay, let's get the obvious question out of the way first. It stands for 'Indoor Flying Object'. Actually, the name is more informative than most.
First the 'mini' bit. Sure enough the original IFO is bigger - 33" wingspan compared with 25" for the Mini. The Mini flies at half the weight which results in a very similar wing loading (1.8oz/sq. ft.)
Second, the IFO bit. Well, there is no doubt that this model is designed for use indoors - this is no 'park flyer'. There is equally no doubt that the model is designed purely for flying. There is nothing in or on it that isn't essential for flight. If you like the way it looks, well that's a bonus, but don't expect it to look like a 'proper' aeroplane, after all, it is sold as an 'object'!
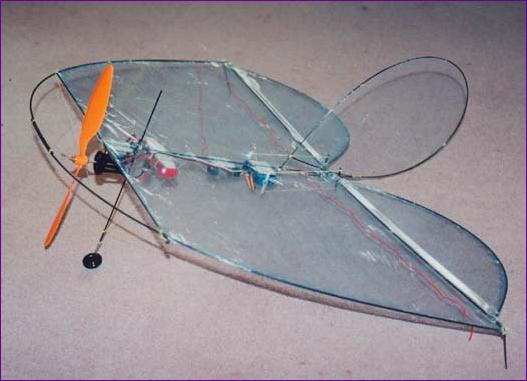
What's it made of?
Well, it may look like someone's had an accident getting an umbrella out of a polythene bag, but the main materials used in the IFO are carbon rod and kevlar thread. If you have no experience in building conventional models then take heart - a lifetime's balsa-bashing won't help you in the slightest! On the other hand, if you used to make your own kites by lashing bamboo canes together then you are just one small step away from becoming an expert IFO builder.
Basically the rods are placed in position, tacked with cyano and then bound with kevlar thread, which is secured with more cyano. This is not always quite as straightforward as it sounds. Firstly, whilst cyano is well known as a very fast setting glue when used with traditional materials, you can wait for an hour or more for it to secure two overlapping rods firmly enough for you to lift them off the plan and bind them with thread. There are two ways round this. The first is to bind the joint with just one or two turns of thread, then apply the cyano - it goes off quite quickly when applied to the kevlar - then you bind the joint fully and apply more cyano. The second approach is to use kicker to force the cyano to harden. I used the first approach and, whilst it worked okay, if you are in a hurry, there really is no alternative to the kicker.
The second problem is the force required to bend the carbon rods - and to hold them in position while you join them. I found this process less difficult than it at first seemed - I used lots of pins in my building board to restrain the rods. However, the forces needed are quite high - that fin for example is one rod bent through 270 degrees - and I was very worried that the rods might break. I wore safety goggles until the rod was safely positioned. Surprisingly, once the various joints are made, the framework feels very stable and secure.
The covering provided is a sort of tinted cling film. The recommended technique is to tape the film to your workbench, spray Spraymount or a similar adhesive on the frame and then place the frame on the covering and run your knife round the outside.
This works - sort of. Spraymount is not really strong enough and the covering does tend to lift. A supplement to the instructions recommends Display Mount, (another Scotch product, I think) rather than Spray Mount and also the use of small pieces of clear tape to secure any lifting edges. I also tried overlapping the edges and sticking the covering to itself. At first I just relied on the film's tendency to stick to itself and in some places this seems to be okay. In other places it has let go and I have experimented with r/c modeller's glue and tape. Both seem to work.
At the end of the day, the covering is adequate for what this model is designed for - flying. Let's face it, this model is not going to help me retain the construction and finish shield!
What makes it go?
This is possibly the most interesting bit, since it should give you a guide to what sort of power plants and radio set ups could work in other models of this size.
I bought the model and all the equipment at the BEFA technical workshop in November and I have included the prices I paid as a guide. Everything, except perhaps the IFO itself, should be available locally.
You will see that some of this miniature gear is actually cheaper than the normal full size equivalent! It is of course possible to shave a few more grams off by paying more and no doubt the advertised weight of 95g is achievable. The weights I have shown are measured. In all cases the advertised weight on the packaging is lower, probably due to the omission of leads and connectors. Having said that, I can't really vouch for the accuracy of my scales to 10% anyway!
And How does it go?
First flight was at the South Hants Indoor Flyers meeting at Fareham. This is a large group of indoor flyers, mainly flying traditional indoor rubber powered free flight models. They all stopped at a designated time and retreated to the hall walls to see what these r/c types could do! As if having thirty odd pairs of critical eyes looking for some entertainment wasn't intimidating enough, the display pilot of Ansa Hobbies, the IFO importers, also turned up to show what the machine really could do.
His display was quite remarkable. Although he was complaining all evening that the model was not handling properly, it didn't stop him cruising steadily down the hall at around 5' altitude then applying full down and tucking under for the tightest outside loop you've ever seen. This machine seems almost to do flick pitching manoeuvres in much the way that the CAPs and Extras of this world do flick rolling manoeuvres. The IFO will also roll pretty fast and will prop hang quite happily.
So, after this display, came the time for my first attempt at indoor flight. I had the controls heavily rated and had no intentions of trying to emulate what I had just seen. The model though had other ideas. It was quickly airborne and seemed desperate to display its prop hanging capability. Both sticks fully forward got me into a porpoising circuit, and a hasty landing to adjust the elevator trim.
Taking off again, it was clear that trim adjustment was not enough and that the IFO was seriously tail heavy. Nonetheless, I did manage a few more untidy circuits before making an unintended and heavy landing (aka crash), whereupon the motor fell off.
In preparation for the second r/c slot, the motor was reattached (a moment's job with Zap and kicker) and a 2mm Allen key was taped to the front of the airframe to pull the cg forward a bit.
Take two
This time the demo pilot flew the large IFO which, after an impressive display, suddenly went out of control (a servo fell off, I think). Curiously heartened by this less than perfect performance, I powered up the Allen key-carrying Mini IFO and immediately felt much more at home. Circuits in both directions were easy, and I felt confident enough to pull some tight turns and even a touch and go. No aerobatics were attempted (the controls were still rated), but even so, I somehow managed to end up in a zero altitude prop hang. For some reason my reaction this time was to chop the throttle rather than try to power out of it. The Mini IFO duly flopped to the floor upside down. Undamaged, it was quickly righted and the rest of the battery capacity was flown out without incident. Great fun.
What's the verdict, then?
The IFO is ideally suited to small halls. Furthermore, the carbon rod framework is very strong. I had been told that, in the event of a crash, all that usually happened was that the motor fell off, and I wasted no time testing this claim! It is hard to see how you would seriously break this model in normal use, but I can imagine the covering will collect a few holes and patches before too long.
Apart from the claim that you can build it and fly it in the same evening (you might, I certainly couldn't!) this model looks like it will indeed do just what it says in the press release and, as long as you don't take it too seriously, promises to be heaps of fun. I can't wait for the regular indoor flying sessions to get established.
Footnote
In case you too have a space crisis in your hanger, you may like to know that the fin is removable and the undercarriage is foldable. The model then packs flat. I carried mine to and from the meeting in a Beales polythene bag - the sort that suits are sometimes sold in, with poppers along the top and moulded plastic handles. It now hangs on a convenient shelf bracket in my workshop by the handle of this bag. You could of course just hang it up by the carbon rod hoop at the front - but don't go testing your latest 14cell, 30amp creation at the same time, or the IFO will take the opportunity for some unplanned indoor flying!
For an update on further experience with (and modifications to) the Mini IFO, visit the Log Book or read the article Indoor Experience
  
|
|