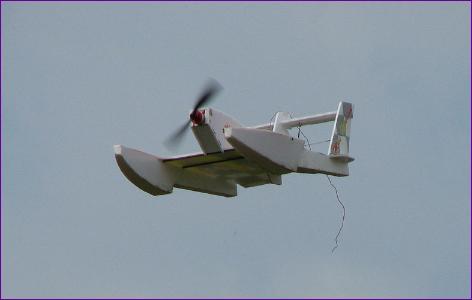
I first became aware of this type of craft when a friend sent me one of those "You won't believe this!"e-mails, with a link to a video on a website. Following the link, I saw someone steering a propeller - driven hydroplane around a lake. The craft did seem to be quite fast but then, after a few quick circuits, the nose lifted from the water in a fashion very reminiscent of Donald Campbell's ill-fated Bluebird. However, instead of flipping on its back, the model stabilised at a 45 degree attitude and climbed away into the air!
I knew that it was only a matter of time before I succumbed, but I did manage to resist for over a year. Then, having replaced my ageing Shock Flyer, I had a Typhoon Micro 6 motor sitting around and there seemed to be no excuses left. A little bit of web research led me to the Robot Birds stand at the Sandown model show, where I bought the Miss Hyperion.
In the Box... There are four sheets of pre-cut 5mm Depron... and not a lot else! Closer examination though reveals that a lot of careful thought has gone into the detail of this kit, so I was hopeful that a similar amount of care and attention had gone into the aerodynamic design too, as I had read about a few flying hydros with some less - than - desirable handling characteristics.
Whilst most Depron pieces are held into their parent sheet by small foam bridges, and can easily be cut or broken free, I noticed that a few pieces were held in place with clear tape. These turned out to be the control surfaces and the reason they had been separated from the sheet was to apply a neat chamfer to the hinge line before being taped back into place - very thoughtful.
There are a couple of carbon tubes which serve as wing spars (there is probably a more appropriate nautical term for the spars which bridge the hulls of a catamaran, but I don't know it!). Also, a bundle of wire and carbon rods and some heatshrink tubing to fashion a total of seven pushrods to enable three rudders and four elevons to be controlled from three servos. A couple of small ply pieces are included to mount the motor and that's about it - except for a large decal sheet, which turns out to be a key part of the structure.
Taking Sides The Depron in this kit is a bit unusual in that it has a glossy skin on one side. The instructions are quite explicit about which way round each piece has to be assembled but the general idea is that the glossy skin should be presented to the water or grass. Generally speaking, the decals go on the other side, but there are a few exceptions, so don't be tempted to skip the instructions.
The Depron parts all interlock and they do fit remarkably well. Some chamfering and fettling is required but, considering that the sponson parts come together at some odd angles, that is only to be expected. The instructions offer two gluing approaches based around epoxy or or foam-friendly cyano. I went for the latter, since I feel that using epoxy on lightweight models such as this is a surefire way to add too much weight. However, there are a couple of places where the instructions insist that epoxy is to be used and one is also advised to go over the finished model filling any gaps with white bath sealant - caulking is the nautical term, I think.
Flapping About The decals are used to hinge the control surfaces. The controls are left locked in neutral by the decals while the servos, horns and pushrods are fitted, then freed up by cutting the decals. On the face of it, this is a good approach. With so many surfaces to be neutralised simultaneously, it is indeed helpful to have them held in place whilst finalising the pushrod lengths. However, I found that, when cut free, the rudders in particular did not move freely. This is because the hinge lines of the rudders are raked back quite steeply. This means that once the rudders move, the holes in the horns tilt and no longer align with the z bends in the pushrods, causing severe binding. This was easily fixed by dismantling the pushrods and tweaking the z bends but, by the time you have done that, the advantage of setting up with everything in neutral has been lost. I also found that the positioning of the holes in the control horns leads to lots of differential in both elevon and rudder movement - and, whilst there may be an aerodynamic justification for some of it, I feel that getting the holes nearer to the hinge lines would have helped.
If I were setting this model up again, I think I would revert to my normal method and install the linkages progressively, checking for full and free movement at each stage.
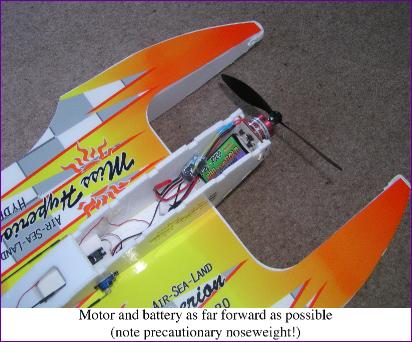
Power Up Two options are given for mounting the motor, assumed to be a small brushless outrunner: Either the motor can be mounted externally or the rotating part can be tucked away inside the central pod, giving it a bit more splash protection when running on water. Initially, I went for the internal approach before realising that, because my 800mah two-cell battery was a good bit lighter than the 3-cell setup assumed in the instructions, I might have a problem getting the cg sufficiently far forward. A quick trial balance confirmed my suspicions, so the motor was turned around to hang out in the breeze.
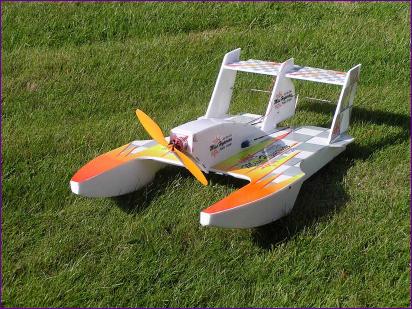
Lift Off All of a sudden, there was nothing left to do. True, I hadn't yet sealed the sponsons with silicone, but the lawn was beckoning! I placed Miss H. on the grass (which, as always, was overdue for a cut) and opened the throttle. I was pleasantly surprised to see that it moved off before I reached full throttle and seemed to steer quite well too. Impressed with the acceleration, I began to wonder whether a short hop could be fitted in within the confines of the garden. Lining up, I gave it full throttle and, since it was still on the ground halfway down the lawn, I gave a quick tug of up elevator . Sure enough the nose came up, so I reduced power, hoping to hold it a few inches off the ground for a yard or so, then settle it back down. Instead the model reared up and, despite my efforts to restrain it, was instantly at head height and running out of garden.
Having read reports that some of these hydros are prone to flipping inverted, I feared the worst but, with a bit of judicious stick pumping, the model 'harriered' down just short of the concrete patio at the end of the garden. Much relieved, I took it back indoors, more than happy now to defer any further experiments until I had a bit more room!
The following day I took the hydro to the local flying field. A final cg check showed that it was still somewhat tail heavy so, bearing in mind yesterday's unplanned skyward leap, I stuck some blu-tac to the front of the sponsons. This seemd to change the ground handling quite a bit. The model now wanted to tip forward before starting to run on the front of the sponsons. Once moving though, this is not a problem and the attitude can be controlled with elevator. After running round for a bit, it was time to line up and go for a take-off. There was no trouble getting airborne and again I had to apply lots of down elevator as the model reared up. It does like to fly at a fairly high angle of attack but even so, I still felt the need for lots of downtrim. So much so that I landed after a couple of circuits and re-centred the elevator control. There was no sign of excessive pitch sensitivity though, so I also took the opportunity to take off some of the noseweight.
And Back Down to Earth The first two flights were both truncated by premature shut down of the speed controller. This served to demonstrate that the Harrier landing which I had credited myself with in the garden was actually pretty representative of the power off glide angle of this model! The good news is that, even with this brick-like descent angle, the impact is not particularly heavy and no damage was sustained. I don't quite know why the ESC was shutting down - it was well within its rating - but I have now fitted a 12 amp unit and taken the opportunity to move to an 8 x 6 prop instead of the original 8 x 4. This has livened up the performance generally and also made it easier to get out of the high angle of attack / high drag mode. As a result, I have been able to remove all the noseweight - but I do have to remember to apply a lot of down elevator when throttling back to avoid the harrier landing tendency.
The sponsons are now sealed and, now that the motor cut-out problem is sorted, I am on the lookout for a suitable stretch of water - watch this space!

 The following day I took the hydro to the local flying field. A final cg check showed that it was still somewhat tail heavy so, bearing in mind yesterday's unplanned skyward leap, I stuck some blu-tac to the front of the sponsons. This seemd to change the ground handling quite a bit. The model now wanted to tip forward before starting to run on the front of the sponsons. Once moving though, this is not a problem and the attitude can be controlled with elevator. After running round for a bit, it was time to line up and go for a take-off. There was no trouble getting airborne and again I had to apply lots of down elevator as the model reared up. It does like to fly at a fairly high angle of attack but even so, I still felt the need for lots of downtrim. So much so that I landed after a couple of circuits and re-centred the elevator control. There was no sign of excessive pitch sensitivity though, so I also took the opportunity to take off some of the noseweight.
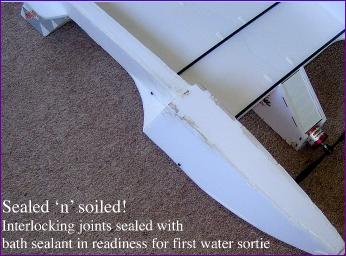 The sponsons are now sealed and, now that the motor cut-out problem is sorted, I am on the lookout for a suitable stretch of water - watch this space!