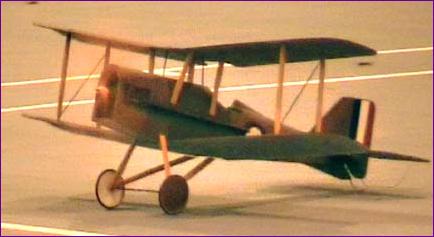
SE5a I first read about slo-fly foam biplanes in the magazines long before I got involved in indoor model flying myself. Having now had my first Depron experience with building the Und Nu, I felt the time had come to tackle a semi scale indoor model. The Und Nu plan came from the team Klaustraphobia web site, so that was my first port of call. I immediately came across plans for a Citabria and an SE5a. For me, the SE5a won out on both appeal and wing area, so I downloaded the drawings, printed them out and started cutting Depron and binding bits of carbon rod together. At first all went well. I had almost exactly the right amount of carbon rod of roughly the right diameters in stock, and it looked as if the Depron parts would all come out of the half sheet left over from the Und Nu. I do vaguely remember thinking that this last part was a little surprising, since the instsructions said that about 1 sq. m. of Depron would be required. As construction proceeded, I read ahead and saw that a 10in prop was recommended. The undercarriage looked a little short for that, but still, there were no wheels on it yet. And the battery box looked a little tight as well... Now, my only excuse for being so slow to realise what is already clear to you, is that I was too distracted by actually building the model to see that it was coming out ridiculously small. At a little over 18ins wingspan, it looked really sweet, but as an R/C subject it was clearly a non-starter. So, this first SE5a was put to one side as a reference model (it might get a rubber motor fitted one day!).
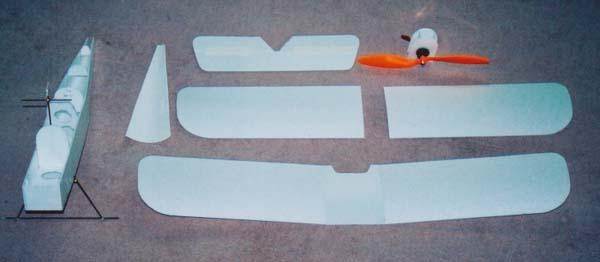
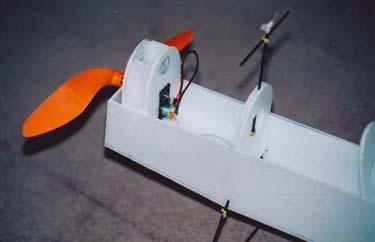
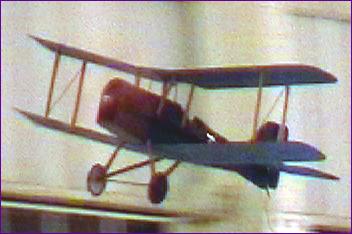
Determined not to make the same mistake again, I scoured the instructions and the web site and e-mailed the designer chappie to find out what size this model should be. Having drawn a total blank, I at last did what I should have done in the first place - copy something else that is known to work. In this case the something else was the GWS Tiger Moth, flown by Phil Wheeler and others. The Moth was duly measured at our next Oakmead session and came out at one Und Nu plus and inch or two. A quick calculation back home translated this, divided by eighteen and a bit, into a scale-up factor of around 160%, so a new set of drawings was printed out and taped together. Meanwhile, I had re-stocked on carbon rods and Kevlar thread at the BEFA Technical Workshop and bought another sheet of Depron, so it was all systems go again. I expected building the second version to be a lot quicker and easier. After all, I had done it before, knew where most of the errors in the drawings were, and the bends in the Depron were far less severe. In fact it seemed to take a lot longer. I am not altogether sure why this was but, when I look at the small model more objectively, although it looks nearly complete, I realise that I had in fact succeeded in putting off quite a few decisions, such as how to mount the motor, how to fit the top decking round the wing supports, and how to attach the lower wings, so much of the time on the Mk 2 probably went in agonising over these details. In truth, there is not a lot to this model. The fuselage is basically a Depron box, with a curved top, and the flying surfaces are just sheet Depron. When people look over the finished model, the two most often asked questions are about the choice of glue and bending the Depron, so perhaps a word or two on each of these is in order: Glue Bends Bending the turtle decking is a different matter though. Here the concern was to get a tight bend without the Depron cracking or creasing. The instructions recommend taping the outer surface to prevent cracking. This does work, but I am not convinced it is necessary. I must confess that, for the rear turtle decking, I did thin the Depron somewhat by sanding both sides. It then bent round without problem - but I made a mess of cutting the fin slot. No matter, I thought, I will cut out another one. I cut out three more turtle decks and each of them creased or crinkled when I bent it. In the end, I retrieved the Mk.1 deck out of the bin and botched the fin slot. The middle and front sections of the fus bent okay first time, so the cause of the failures is a bit of a mystery. All the pieces were from the same sheet but it is just possible that some were cut 'across the grain' so to speak. Also the two faces of the sheet sometimes look different and it may be that the sheet bends better with one face on the inside than the other - plenty of scope for experiment! Structural Integrity Fitting Out Flight Test The main conclusion from this first outing was that the model was well worth painting...... Finishing (well, nearly!) Asking around about others' experience with airbrushing brought a bewildering range of answers, perhaps the only common factor being that they are a devil to keep clean. As for air supply, most people seemed to think a mains powered (ex-fridge) compressor was necessary, although others referred to compressed air cannisters or even something which sounded like a variation on a blowpipe. My ears pricked up when Dave reported that he used a 12v car tyre inflator connected directly to a cheap Badger mini spray gun. He very kindly offered me the loan of this set up and so the experiment began. I will spare you the long version, and leap straight to my conclusions from what was a rather steep learning experience: Acrylic paints are fine on Depron. However I just couldn't get on with the artists acrylics sold in tubes, even though the ones which I bought are clearly marked as suitable for use with an airbrush. However I thinned them, I couldn't find the happy medium between a runny mess and a splattering of freckles. Tamiya acrylics, by contrast, are terrific. These come in jars, at about a £1 per jar, and need no thinning. As a bonus, the jars screw straight onto the Badger spray gun, so colours can be swapped in an instant and there is no jar to clean afterwards. The Badger 150 mini spray gun works well for this kind of area coverage job. If you want to spray fine detail though, you would probably be better off with an artist's airbrush. Because the Badger is an external mixing gun, there is only one nozzle to get blocked and this can be cleared easily with a pin. The 12v tyre inflator provides lots of pressure (typically up to 150 or 200psi). However, the limiting factor is the volume of air it can deliver. With Dave's combination, the volume match is pretty good. When the air button is pressed there is a sudden high pressure burst, then the pressure drops to around 20 - 30psi, which is within the recommended range for the spray gun. I have bought myself a similar set up and will look into some way of reducing the initial high pressure burst, perhaps by using an air reservoir and maybe a pressure relief valve. After the stress of spraying the basic airframe, I then enjoyed myself dressing the SE5 up a bit. This included adding Depron undercarriage and wing struts, dummy engine cylinders (more Depron) and exhausts (drinking straws). I cut out and painted a paper dashboard and had a go at carving a pilot out of blue foam. Unfortunately the latter looked more like Red Riding Hood's grandma - after the wolf had called - so the cockpit at the moment is still unoccupied. I had difficulty locating some suitable roundels and eventually had to settle for some Flair WW2 vinyl stickers. Not truly authentic, printed on a relatively heavy vinyl and, at a cost of £5, they more than doubled the cost of the model but never mind. Finals
|
||