Ikarus Shock Flyer
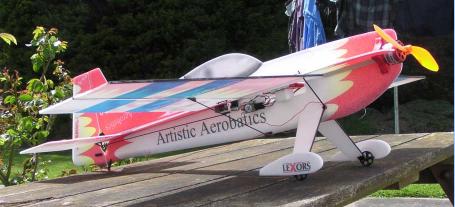
I first saw the Shock Flyer at one of the Fleming Park indoor flying sessions. There were two of them, loosely based on the Edge and the Extra. Both seemed to perform equally well, and in the hands of competent pilots, would not only out-roll an IFO but, being equipped with a rudder, were capable of knife-edge flight and a full range of prop hanging /3D manoevres. The instant impression was definitely of a "Must have one" aeroplane. It turned out that these models were only just coming into the UK and were priced at between £25 and £30. I later learned that Channel 4 Models in Charminster had ordered some, so I registered my interest. A few weeks later I was the proud owner of an EXTRemA and a Typhoon Micro 6 brushless motor with a Tsunami 10 amp speed controller. These last two items are a large part of the key to success of this model. The motor in particular has a potential power delivery in excess of a standard Speed 400 at a fraction of the weight. Discussions with Mike Seale, the owner of one of the models which I had seenat Fleming Park, suggested that the method of mounting the motor should be an early consideration, it being an outrunner type with a rotating case.
Step 2 involves attaching the carbon fibre leading and trailing edges to the wings. A tube of UHU Por styrene glue is included in the kit and for most operations such as this one it is used as a contact cement. Since these full length carbon fibre strips also serve to join the two taperedwing panels, you do need to give some thought as to how to ensure that you align them correctly. Being unfamiliar with this glue, I also took the precaution of roughing up the faces of the carbon strips to ensure a good bond. Unfotunately, this also ensured that any glue finding its way onto the pre-decorated surfaces of the wings was impregnated with black carbon dust, leaving unsightly smudges. You can tell that I am not an experienced ARTF builder, can't you! Once I had got the hang of the glue, the rest of the assembly was pretty straightforward, although as always, it does pay to dry fit thenext two or three parts before committing to the contact adhesive. With care though, the fit of the various fuselage and tail parts is really very good.
Most of the vulnerable Depron edges are reinforced with clear tape, which is also used for hingeing the control surfaces. The only balsa in the kit is two pieces of 6mm triangular stock which are used to stiffen the fuselage. These of course are undecorated and do look like something of an afterthought. For batteries, I again took Mike Seale's advice and bought two 2-cell 360mah Li-Po Kokam packs. These cells are a huge leap from the 700mah Li-Ion packs which themselves revolutionised the indoor scene barely a year ago. With the Li-Ion cells one normally sets a maximum currend draw of 2 - 2.5amps for the 700mah battery. The 360mah Li-Pos by contrast are capable of supplying 7 or 8amps, at least in short bursts. The combination of lighter weight and higher current delivery, together with the efficiency of the brushless motor, means that the Shock Flyer enjoys a thrust to weight ratio of between 1.5 and 2 to 1 - hence the spectacular hovering performance. One of the joys of the Li-Ions was that, with four or five 5 minute flights being possible off a single charge, two or three packs were sufficient to see out a typical evening's flying session without the need to bother with re-charging. With the higher current capability of the Li-Pos though, flight durations are back down to five or six minutes again, so re-charging them during a session becomes a real issue. There are already a few chargers appearing to address this need but, with the present state of Li-Po technology, we cannot match the 15 - 20min re-charge times that we are accustomed to with NiCds. Once the technology becomes established in the power tools market though, this will hopefully change.
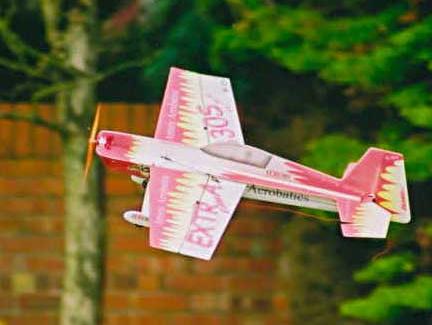
First flights of the Shock Flyer were indoors. To make the most of really small spaces, one tends to fly slowly at quite a high angle of attack. Whilst the ailerons do still work at low speeds, lots of rudder is called for to swing the model round in tight turns. Once you get used to this it is astonishing just how tightly the model will turn. Because of the power available, there is no need to build up speed before embarking on a loop - just pull up the nose and open the throttle. Rolls are very fast so again there is no problem in performing general aerobatics in a small hall. As luck would have it, one of the Country's top pilots chose that evening to visit our club flying session and so I gave him the transmitter and watched the Shock Flyer perform effortless hovers, torque rolls, knife edge flight and rolling circles, so there is plenty there for me to 'grow into'! I have subsequently had the chance to fly the Shock Flyer outdoors and, without the ever-present threat of the walls, felt able to attempt some of the more advanced manouvers for myself. The model inspires confidence and I was soon doing untidy knife edge passes, something I have never been able to do. I think the Shock Flyer is set to be my aerobatic trainer - it is so much more relaxing trying new things on such a small, light (and inexpensive!) model than on a large fast aerobatic machine.
|
||
 Having pondered this for a little while, I resorted to the radical approach of reading the instructions. These indicated that the motor shaft could be reversed so that the fixed part of the motor is at the back and the propellor shaft emerges from the rotating motor body. All I had to do now was to manufacture a suitable lightweight mounting plate to attach the motor to the foam (Depron?) fuselage. I made this from a sandwich of two pieces of 1/32" ply around a piece of 3/8" balsa. The inclusion of thebalsa served to provide a larger glueing area over which to spread the load back into the foam structure. The photograph shows the final arrangement.
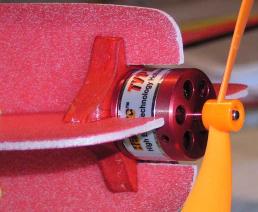 Reading through the instructions for the model, I could see no other necessary changes so I embarked on Step 1. This involves taking the scalpe to each wing panel and removing a portion to form the aileron. I sometimes think that it is patronising when reviewers say "measure twice and cut once" and in this case I certainly need make no such entreaty. I guarantee that when you transcribe the given measurement onto the wing panel, you won't believe it and will check it at least twice more. The ailerons are absolutely enormous!
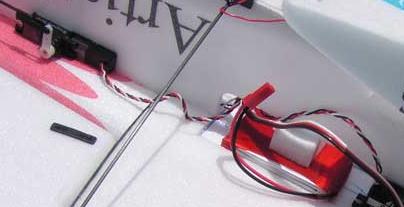 Some may think that even £25 is a lot to pay for less than one sheet of Depron. However, apart from the fact that the Depron is beautifully finished (until you adorn it with black fingerprints), there is a fair quantity of carbon fibre in this kit and a large sprue of injection moulded bits and pieces which make the often tedious process of joining carbon firbre rods to Depron edges much more satisfactory. This sprue also includes the wheels and some very neat control surface horns and clevises, resulting in the easiest and neatest servo installation that I have come across.