|
   
The Stearman Story
by Trevor Hewson
Celebration
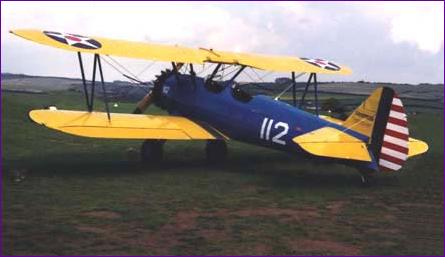
For my 50th birthday my wife fixed it for me to fly in a Boeing Stearman (pictured above). This was arranged through her brother, a BA pilot, and on the day in question both he and his son James, an air training cadet, were also going to have a go. Our instructor was a Concorde pilot who obviously felt the need to do some real flying at weekends.
Preparation
It was a memorable experience, not least because of the instructor's words as we lined up on the end of the grass strip at Old Sarum. True, we had all been given a full briefing on the controls and handling characteristics of the Stearman and I must admit I had found it most interesting. I had even understood some of it well enough to ask what I thought were quite intelligent questions. But I had assumed that this briefing was really aimed at John and James and, whilst I was hoping to be allowed to take the controls at some point, I was totally unprepared for what came crackling over the intercom as we sat there at the threshold: "Okay, take off when you are ready"!
Concentration
The uneasy mix of anxiety and anticipation that I had been feeling during the taxying stage instantly gave way to more urgent emotions (panic, I think, is the usual word for it) - 'has he got us mixed up?', 'does he realise I have never sat in the cockpit of a plane before, let alone flown one?', 'Perhaps I shouldn't have tried so hard to ask those intelligent questions!'. Eventually the brain engaged a more constructive gear and, as I pushed open the throttle, extracts of the preflight briefing came swimming by - '...push forward to get the tail up...'. Entirely against all my instincts as a model flyer, I gingerly eased the stick forward - "Push forward!" crackled the intercom "What, more?", "Yes, push hard!"
Consternation
Up came the tail and up came the next instalment of the preflight action replay - '...the main thing is to keep it straight...'. Now this was no ordinary day at Old Sarum, it was the Grand Aerojumble and, as the horizon came into view over the throbbing cylinders of the Lycoming engine, I was confronted by the sight of light aircraft neatly parked three or four deep all down the left hand side of the runway. I felt my right foot tense - if I didn't manage to keep straight I was going to make damned sure we didn't swing left. I just hoped that my foot was on the rudder pedal, not the toe brake.
Elation
Easing off the forward pressure on the stick, and the briefing replay resumed '... it takes off by itself, really...'. At that point the bumping and jolting stopped and we were airborne - magic! The combined sense of elation and relief guaranteed that I was totally immersed in, and thoroughly enjoyed, the whole flight. I was even persuaded to loop it. So determined was I not to hang in the straps at the top that I quite forgot to throttle back on the way out. I am here to tell you that the Stearman will fly much faster and withstand considerably more 'g' than the notice in the cockpit says - oops!
As I said, a memorable day.
Re-creation
No wonder then that ideas of building a model Stearman soon arose. Attempts to find a kit or plan to an appropriate scale drew a blank (It had to be suitable for electric flight in the local park). Then the building of my P38 sort of took over and I downgraded my Stearman ambitions to building a plastic model - but couldn't find one of them either.
On and off over the next two years I enquired at model shops and museums in the UK and in America, wrote to magazines and got absolutely nowhere. Then, at the Bovington model expo last year, there, sitting on the grass, was a beautiful Stearman.
After a few enquiries, I was introduced to the builder, John Stracey. His model was built from a Sterling kit and was a bit larger than I had in mind at 64" span, powered by a .90 and weighing 10lbs. Nonetheless, it was at least a starting point and John kindly offered to lend me the plans. As we swapped addresses and phone numbers, I explained how I had come to be interested in the aircraft. He listened to the above tale with a quizzical expression and at the end said simply, "Yes, I flew in one for my 70th" - spooky!
Contemplation
I visited John a few days later and came home armed with the plan for the 64" Sterling Stearman and also with a Guillows kit for a 28" version for freeflight, rubber or control line. So a simple decision was needed; whether to scale the Sterling plan down or the Guillows plan up - and to what size?
Well it sounds like a simple decision, but it took a long time. Because these are plans from kits, not all sections and parts are drawn. What is more, whilst the Guillows plan showed a generally lighter approach to construction, there were some problems when contemplating scaling up, not least of which was that, at 28", it is naturally designed as a one piece model.
I decided to work from both sets of plans and sought a number of club members' opinions on what size a 15cell powered Stearman should be. There were two votes for 60" span at 7.5 to 8lbs and one for 50" at 5.5lbs. My own sums had led to 54" and a weight of 6lbs. These are all very consistent in the wing loadings and the variation comes down to just how much power the electric set-up will give.
Using the 50watts/lb rule of thumb and 15 cells, a 6lb model would have to draw 20amps. Pushing this to 25amps points to an all up weight of 7.5lb. Since my Sukhoij weighs 7lb with only one wing and one cockpit and no struts, wires, radial engine etc., I was not confident that I could get the Stearman to come out any lighter so, after much hesitation I eventually plumped for 58" wingspan and arranged to get the plans copied and scaled accordingly.
Modifications
Although I wanted to produce a reasonably true to scale model, I was concerned that it should fly well. Having decided on the wing loading and power loading, my next concern was the wing section. The Sterling plan shows an odd looking section that is possibly scale. However, I discarded this and opted for the NACA 2412, modified as recommended by Gordon Whitehead in his book "Radio Control Scale Aircraft". This modification consists of flattening the underside to the rear of the maximum thickness point to simplify building.
This section was thinner than the original, so the mainspar had to be re-sized and the wing set somewhat lower so that the underside could blend in with the fuselage profile. Although the NACA 2412 is more cambered (ie less symmetrical) than the original, I tried to keep the rigging angles the same, on the basis that the idea was to be able to fly more slowly at the same angle of attack.
On the subject of rigging angles, I was surprised to see that the tailplane on the full size is rigged at three degrees positive angle of incidence. The only reason for this would appear to be that the tailplane is positioned in the downwash of the upper wing and so will still be operating at a negative angle of attack relative to the local airflow. Interestingly, both of the model plans show the tailplane rigged neutrally. Does this mean that downwash is yet another feature of aerodynamics that doesn't scale down simply to model dimensions? Answers on a postcard, please.
Most other modifications were in pursuit of weight savings:- The solid maple and balsa spars were replaced by hollow box sections, the wingtips were laminated, Lazy Bee style, from balsa, solid trailing edges replaced with 1/16" sheet, and so on.
Fabrication
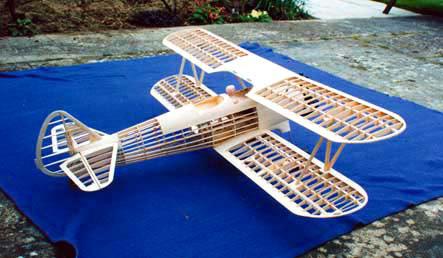
I bought a load of wood at the Model Engineer exhibition and, after all the agonising, it was a relief to pick up the scalpel and glue pot and start building.
Although there are two wings, each with a lot of ribs (38 each, to be precise), the wings are at least constant chord so batch production is straightforward. I did though need to construct a chart to work out how many ribs needed holes for linkages, how many needed to accommodate a double webbed spar, how many were outboard of where one spar web ended, etc. All ribs would have lightening holes of course - except those where aileron bellcranks had to be mounted. Ah yes, mustn't forget the interplane strut anchorages either - and the aileron spars. And the centre sections are sheeted. And then there's that cutout in the rear of the centre of the top wing to think about, as well as the attachment to the cabane mounting struts. Well, a few of the ribs were the same!
Acceleration
Although cutting out the ribs and making up the spars seemed to take forever, once the ribs were slid onto the spars, suddenly a half built wing seemed to appear out of nowhere. After a month, the lower wing was complete, including ailerons. Another three weeks saw the three top wing panels basically built and at this point, wing building stopped until there was a fuselage to attach them to.
My reasoning here was that mounting the upper wing was going to be tricky and, once the upper centre section and the lower wing could be fitted to a skeletal fuselage, I could then glue the upper outer panels to the centre section, ensuring that the two wings lined up properly.
Cogitation
As I mentioned earlier, there were no cross sectional drawings on the Sterling plan from which to cut fuselage bulkheads. What is more, when I checked the drawings on the scaled up Guillows plan, they did not equate in height or width with the side and plan views on the Sterling plan, so each bulkhead had to be scaled individually. I took a view on each bulkhead on how much to fret out, bearing in mind the need to attach undercarriage, cabane struts etc., and used a mixture of balsa and lite-ply, reinforcing the load bearing areas with 1/16" ply.
In the interest of weight saving, the ply box around the wing seat and u/c area was abandoned completely, a little liteply reinforcement being used where necessary. With the help of a clubmate with a wire bender, the various wire parts were bent to shape and the basic fuselage shape began to appear fairly quickly. It was still fairly flimsy at this stage and I found it hard to judge how much the balsa stringers would stiffen it up. I would have to wait some time before I could find out, because the insides had to be sorted out in the meantime.
Motivation
I made up a rolled ply tube to take the motor and gearbox. This tube was fitted into a laminated balsa and ply firewall, and the motor temporarily fitted. It was now time to estimate the cg in order to decide where to mount the battery, and how it was to be removed and inserted (This is not a model where you can just whip the wings off to change the battery.) Allowing about 4oz for the dummy engine, I reckoned that the battery could go up against the undercarriage bulkhead, providing a firm restraint against forward movement. By using a suitably angled ramp, it was possible to arrange for a 15 cell battery (made from an 8 cell pack and a 7 cell pack taped together) to be inserted through the front cockpit aperture (just!).
So, in a little over two months, I had the bare bones of an aeroplane, apart from the tail surfaces. However, things now slowed down more than somewhat. Sorting out the lower wing mounting took a little time, but was not too bad. I now had a reference to sort the top wing mounting which took a lot longer. However, I eventually got to the point where the top wing could be jigged up and the panels joined. After the centre section was completed and sheeted in, the wings were again set aside and work resumed on the fuselage.
Complication
Looking back, it's hard to see where all the time went, but basically it was all down to two factors. The first was asking at every turn "is there a lighter way of doing this?" and the second was the work needed on those parts for which the kit builder has the benefit of plastic mouldings. In this latter category are the undercarriage fairings and, of course, that fully exposed radial engine!
Dudley Paterson of Flair was very helpful in sending me a selection of cylinders from Williams Bros. to choose from. However, the Wright J5 engine which these cylinders represent differs from the Lycoming used in 'my' Stearman in a number of ways, the most obvious being the prominent exhaust collector ring on the front of the Lycoming. Much balsa sculpting was therefore needed on both engine and undercarriage. With the u/c though, there was the added complication of allowing the wire to flex without breaking the fairings. After much thought, a 1cm layer of EPP foam was introduced between the upper fairing and the trouser part, the latter being fixed to the wire with silicone in the hope of providing a little more give. A layer of masking tape was used to cover the foam to provide a smooth base for the Profilm later. Time will tell whether this all works.
Elaboration
The tail surfaces themselves presented little problem and construction changes mainly involved reducing wood sections to save a bit more weight. The tailwheel area was though modified, this time in the interest of scale fidelity. The Stearman tailwheel exits through a rather prominent leather gaiter covering what in effect is a void between the end of the fuselage and the base of the rudder. On the Sterling plan, the stringers are simply carried to the sternpost, with no attempt to simulate this characteristic feature. I eventually managed a reasonable representation of the full size arrangement, but not without making a serious hole in my wallet - literally. But the leather was just the right weight! Even so, I suspect that this modification more than wiped out all my previous weight savings at the rear end.
Improvisation
Finding suitable materials for the various details is always a challenge and I was particularly impressed by the versatility of electric cabling. Oil hoses and exhaust pipes on the dummy engine are from insulation sheathing, as is the black padding round the cockpit apertures. The ignition wiring on the engine is from telephone wire.
The windshields are cut from a clear acetate report cover and joined with silver trim tape - does anyone know a good way of securing this trim strip when it lifts? I now have two cockpits which are suffering from peeling window frames.
The wheels are proprietary plastic items, but I wondered for some time what to do about the painted wheel discs. I thought of screwing these to the wheel as per full size practice, but this posed a problem of how to retain the wheel, so I cheated and used standard wheel collets with Liteply discs cyanoed onto the collets. Okay, so the disc doesn't go round with the wheel, but the general effect is fine and I can slip an Allen key behind the disc to remove the wheel easily.
Decoration
Lettering and insignia were home made from Solartrim and Protrim and a few panel lines added later along with a fuel filler cap.
So far, I haven't tackled the question of rigging, and I may not bother because the model has plenty of character, what with that engine, two open cockpits, two wings and struts etc. At present it is quite quick to rig and this is, first and foremost, a flying scale model after all.
But I'm getting ahead of myself. Part way through this finishing process, I succumbed to impatience...
Determination
It was a Tuesday, at about 4pm when I looked out of the office window. The sun was shining - itself a rarity for the June of 1998 - and the trees were relatively quiet. I took the decision there and then, this would be maiden flight evening. I would do it before the anxiety had a chance to build up.
I got home about 5.30pm and the wind was increasing. Never mind, the decision was made. With shaking hands, I assembled the model, trying hard not to put the screwdriver through the wing. The batteries were put on charge and I fitted a couple of ounces of lead inside the dummy engine for safety's sake. Only then did I realise that, in my nervous state, I had checked the cg without fitting the flight pack!
Prevarication
I now set about recruiting some moral support. First Neil - message left on machine. Jim - no reply. Clive - "A bit breezy isn't it? Okay, I'll come". Neil calls back "Don't think I can make it". Jim calls back "What tonight, don't you realise England are playing Argentina?"
After a few more checks on things which I had checked a dozen times before, I arrived at the park at 7.30 to be greeted by Clive, Jim and Dave (I guess the football won with Neil). I took a few photos (another superstition) and we tested the air with my Crossfire and Dave's large Lightfighter. Not silky smooth, but not bad enough to provide an excuse. The wind was coming straight from the now sinking, red sun and the light was too poor for sunglasses. This eliminated any chance of standing behind the model on take-off and meant that the climb out had to be a right hand turn over the famous Kings Park model-eating tree. After a range check, a fast taxi run seemed to be in order, to test the ground tracking, assess the power level, and hopefully get a feel for the trim. I also took Jim's advice and rated the elevators.
Elevation
I had barely got the throttle open fully when the right wing lifted and the model veered left. The tail never came off the ground. Chop the throttle and think. There seemed to be plenty of power and so I fed in a few notches of right rudder and down elevator and carried the model back to the start point. No more excuses left.
This time lift off again took me by surprise. The Stearman literally leapt into the air, climbing far too steeply. A firm push on the elevator was needed to restrain the climb and the model then obligingly settled into a right hand turn as I called for some assistance with the elevator trim. By the time Dave had fed enough down trim in for me to feel comfortable, the Stearman was on its third right hand circuit, and it was time to see if it would turn the other way.
Aileron response was smooth and positive (although, looking at the video which Clive took, the model was flying quite fast, so low speed aileron response is still to be tested). Throttling back to begin a landing circuit, and I was nearly caught out. Instead of dropping its nose, the aeroplane just slowed down, and needed forward pressure on the elevator to be persuaded to descend and maintain flying speed. I have been told since that this is not uncommon with biplanes.
On finals, I progressively reduced the down elevator and then became concerned that I might not have enough speed to flair out. A quick burst of throttle arrested the descent and the Stearman floated by, eventually settling into a gentle touchdown, albeit on one wheel first. So relieved was I that I was halfway to collect the model before I realised that I could taxi back!
Observations
After this first brief flight I reflected on the preflight briefing on the full size. "Push forward to get the tail up or it will take off too soon." "Make sure you keep it straight". I also reflected on the down trim I had had to dial in - looks like the equivalent of about 3 degrees positive incidence on the tailplane. (You may recall that I had noted, but ignored this feature on the full size drawing). Conclusion? More like the real thing than I had bargained for - and well worth carrying on and finishing it!
Consolidation
All finished now, except for the rigging, the next flying opportunity was on a club night at Stanpit. The setting sun (upwind again), a kite flyer and the bungee all added to the anxiety factor and I was very glad to have that earlier trimming flight under my belt.
Take off was beautiful to watch and, apart from the merest touch of rudder as the throttle was opened, watching was all that was needed. After the climb out I gained enough confidence to slow it up. Although I have yet to try an out and out stall, low speed handling seems very secure. No aerobatics were attempted and, in view of the congestion on the field, a landing was organised while there was plenty of battery left.
The third outing was at Kings Park where confidence grew further, resulting in the first loop. The loop is lazy, just like the full size, and requires only a very shallow dive. Much to my relief, the press stud strut fixings were all in place on landing, suggesting that the wings were not unduly stressed during the manoeuvre.
Congratulations
Still with no rigging, the Stearman's next appearance was at the BEFA Woburn Abbey fly in. This is a beautiful site but, although the strip is mown especially for the event, it is basically grazing land and so is more tufted and bumpy than it at first appears. Needless to say, the prospect of a nose over onto that dummy engine does not bear thinking about!
I need not have worried. The undercarriage on the Stearman is well forward (which is why the full size is notorious for ground looping) and the rough ground simply helped the tail to come up, giving rise to the most realistic take off yet. Perhaps on smoother ground I really do need to use some down elevator to pick the tail up, as per full size practice.
I had two very enjoyable flights at Woburn, mainly stooging around, but fitting in the odd loop, roll, reversal and stall turn as the traffic permitted. As luck would have it, I also managed two good landings. Well satisfied though I was with the day's flying, I was still more than a little surprised to be awarded first place in the Scale category for the day. This at least resolved one long standing uncertainty - if the model is good enough to win at an event such as this, then there is little point in frigging around with rigging - well, not yet, anyway.
The fact that at the club AGM this year the model also won our annual Construction and Finish competition has only served to confirm this view.
Culmination
You will have gathered by now that I am more than a little pleased with the Stearman. It is a pleasure to fly and it captures the spirit of the full size to a degree beyond my expectations. I look forward to re-living my 50th birthday many times over!
   
|
|