|
   
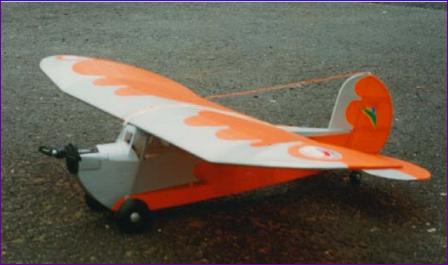
Lazy Bee
Kit review by Trevor Hewson
originally published in June 1996
Decisions
I don't know about you, but there always seem to be so many jobs competing for one's attention around the house that it is difficult to know where to start. To avoid grappling with such difficult decisions I find it helps to ensure that there is always a model on the building board. That way, the household duties can be kept firmly in their rightful place - at the bottom of the priority list!
So it was that, having finished the Sukhoij, I was contemplating what to build next. This is every bit as difficult as choosing between competing household jobs, but infinitely more enjoyable. I had come across the Lazy Bee before and, frankly, never given it a second thought. It is an odd looking vintage style aeroplane looking a bit like a flying flea that didn't come out quite right. Why would anyone design anything like that in the 1990's?
I was quite keen to build a Speed 400 powered glider for relaxing flying from small fields. After all I already had two HS80 servos in stock and also a geared Speed 400 motor. Having seen and flown Clive's Ohm Maiden, I was even more keen to follow this route. However while still in the stage of indecision, two things happened. Firstly I went to the Model Engineer Exhibition (now known as the International Model Show) and was once again impressed by the indoor flying activities. Secondly whilst flying at the local park we were invited to consider putting on a flying display inside the athletic arena at the fund raising Model Railway Show on the May day bank holiday.
Now I'm not sure I'm ready for the challenge of indoor R/C yet, but the athletic arena looked a very realistic prospect. However, whilst the Ohm Maiden has a low wing loading and handles well, for display flying in confined spaces, something a little more agile (but still slow) would be ideal.
It was then that I came across the Lazy Bee again. What is more, it seemed always to be accompanied by some unlikely claims eg overseas modellers writing about the hours of fun they have had with their Bees, and, most unlikely of all, a claim that it is the most popular electric model of all time in the USA!
More Decisions
Like all things American, the Lazy Bee comes in all sorts of varieties. What's more you can buy a kit or just the plan. Hillcott Electronics who import the kits also offer to supply suitable wheels (vintage style balloon tyres on wooden hubs) and even the covering - a real one stop shop service. I opted for the 48" span version, went for the kit rather than the plan, took up the offer on the wheels and deferred a decision on the covering. The last part of this decision proved to be a mistake but I suppose three out of four ain't bad!
Impressed?
If you are easily impressed by huge kit boxes with splendid artwork then don't bother with the Lazy Bee! The box measures a paltry 32" x 4" x 4", and there was still plenty of room in there for the wheels - and the free Lazy Bee baseball cap, which came as a surprise extra! Apart from the hat and the wheels, the only other items visible are an instruction book and the plan. The book consists of 39 pages, well illustrated with step by step drawings. Unrolling the plan reveals three good size CAD produced sheets, including templates for laminating up curved parts and for cutting out the covering material (which I didn't order, remember).
Oh, and what's this that fell out of the rolled plan? Ah yes, the kit. One bundle of wood, most of it 1/8" square, together with a few nicely cut but unlabelled die cut sheets, a small length of bamboo and wire and a roll of what appears to be cling film. Is that it?!
Well yes it is, actually. Okay, so no horns, snakes, hinges and clevises are supplied (I found what I needed in stock anyway), but apart from that, the kit, contrary to initial impressions, is surprisingly complete.
As to quality, well, my kit was a bit of a mixed bag. The strip wood varied in weight (no bad thing) and was all straight and useable. The diecutting was clean and generally accurate. However, the 1/16" sheet provided was of heavy duty floorboard grade and the 1/8" sheet, although of good quality, was too small no matter how I tried to lay out the parts to be cut from it.
Time to Learn
The first step in the construction took me straight into uncharted territory - laminated wing tips! Actually, this was not quite the shock it could have been because, although it is step one, you don't get to it until chapter four on page fourteen - and chapter three is all about how to make balsa laminations! Having studied this, the procedure went fairly smoothly and I have to admit I felt very satisfied with the result, especially when it was later sanded down to a graceful curve.
Apart from the laminated tips, the wing construction is straightforward. Note though that there is no sheeting, not even in the centre section, and the trailing edge is 1/4" square. We are not in the land of laminar flow airfoils here! The airfoil by the way is flat bottomed (because the fuselage is flat topped) and although the instruction book does give instructions for an optional bolted on wing, I took the designer's advice and stuck to the time honoured rubber band technique.
Bodyworks
The fuselage ('body' somehow seems a much more appropriate word in this case) is made almost entirely out of 1/8" square balsa. Where it is 1/8" x 1/4" you use two strips of 1/8" square. Where it is 1/8" x 3/8"... well, I'm sure you have got the idea by now.
Again, this is a relaxing and satisfying piece of building. One interesting feature is the undercarriage which consists of a straight piece of 1/8" piano wire passing through a rectangular slot in the fuselage, retained by a rubber band across the bottom of the fus, so providing a simple but effective sprung u/c. The instruction book contains a high tech option using oil dampers from r/c car parts, but again I opted for the simple approach.
My main problem area was the front end. Being an indecisive sort, I wanted the option to fit either the aforementioned geared Speed 400 unit or my venerable ex-Aerojet Kyosho 480T, with an Olympus belt drive unit given to me by Keith some 4 years ago. (Yes, I am mean as well as indecisive!) These two units are totally different in size and shape and devising a scheme whereby they could be easily interchanged took more time (and certainly more mental effort) than the rest of the model put together. The end result is very satisfactory but, if you should want to do something similar, I now know how I should have done it!
Back End
All very straightforward and neat, including more curvaceous laminations. A nice touch is that the spring coil is already bent into the tailwheel wire - a big help for metalwork morons like me. Considering that everything else is built up, I was surprised to find that the tailplane was 1/8" sheet. Lightening holes are suggested and chapter two even tells you how to make a compass cutter to make them. I guess that's as near as they could get to supplying the holes ready to fit.
Cover up (or not)
It always seems a shame to cover structures like this, especially since this is the first aeroplane I have built entirely without the use of filler! The recommended covering is Litespan and the instructions devote a whole chapter to how to do it. They even tell you how much to buy for the two colour scheme for which the templates are provided.
I consulted my colour consultant (wife) who decided that orange and brown would look good and then set about finding a Litespan stockist. As luck would have it, Paul then told me about Spire Models in Salisbury. Always keen to suss out a new model shop (well new to me, anyway) I rang them up and yes, Litespan was in stock. Off I set, pausing only to toss the Phase 6 into the car to make it a round trip via one of the intervening slopes.
Litespan doesn't come in brown, so I had to choose another colour to go with the orange. This was summarily rejected by aforementioned colour consultant so, next Saturday, we were once again Salisbury bound. The insipid grey I had selected was exchanged for a more solid looking silver grey with no problems so, on returning home, I set about unfolding the sheets and laying out the patterns. Now the instructions definitely said two sheets of orange and one of silver. The only snag was that my sheets were three feet long and the ones referred to in the book were six feet. As I said, the decision not to order the covering with the model was a big mistake!
After all this frustration, I must say that Litespan is a joy to use. Because you apply the adhesive (Balsaloc) yourself only where it is needed, Litespan is much lighter than a self adhesive film when used on open frameworks and really does stiffen up a structure like the Lazy Bee wing.
By the way, that 'Cling Film' turned out to be an iron on self adhesive film for the windows - much lighter than acetate sheet.
Mechanicals
There is plenty of room for servos of any size and my HS80s looked lost deep down in the depths of the fuselage. I used balsa pushrods to rudder and elevator and sat a Futaba Rx and speed controller in a block of foam in the base of the fus. I then constructed an elaborate battery tray inside the wing seat for a 1700mAh 7-cell pack, being nervous that if I had put it at the bottom it would give to much of a pendulum effect. The battery tray had to be removable to give access to the radio gear and also because the Speed 400 option needed its lighter battery positioned a lot further forward in order to maintain the correct cg.
Testing Times?
After the early trauma with the Sukhoij, I was determined not to be over complacent with the Lazy Bee. Nonetheless, apart from a worry over the likely rudder response (there is not a lot of dihedral!), it was hard to see what perils such a slow docile model could have in store. I am pleased to report (even if you may be disappointed) that indeed it had none.
The first flights were with the 480T/Olympus unit. The take off run was extended due to a lack of up trim but, once up was instructed, up it duly went. It turned when asked, seemed almost stall proof, performed ridiculously tight loops and will fly tight circles better than any control line model I know.
After a couple of flights the lighter Speed 400 was fitted together with a 500mAh battery pack. This combination brings the wing loading down to a rather silly 6oz/sq ft. (compare this with the Sukhoij at 26oz/sq ft).
No doubt helped by the Trexler Balloon Wheels the model trundled gently forwards and was soon airborne. Things now were definitely relaxed! The model really lived up to its name and, whilst it would still loop, it did so in a very lazy fashion. Duration was quite short on the 500mAh cells, possibly due to my propellor selection technique - I chose the one with the right size hole in the middle, which turned out to be a second hand 10" x 7", cut down to 9" diameter. With only a 1.5:1 gearbox, this was perhaps a bit much for the Speed 400, and I have since changed to a 9"x6".
Verdict?
In the Lazy Bee's first month I clocked up 25 flights and enjoyed every minute. It will loop and stall turn, do touch 'n' go's and, considering the low flying speed and lack of ailerons, it copes surprisingly well with turbulence.
Flight times with the Speed 400 configuration are now a respectable four minutes on my 500mAh battery. This could no doubt be extended by the use of 700mAh pen cells. Most of my flying though has been carried out with the 480T. Although under propped, there is ample power for take off and it will loop from level flight - who needs more? The pay off is in duration with flights of 10 minutes from a 1700mAh pack, with no thermal assistance.
The Lazy Bee is different. It has charm and character and is unpretentious. This is best illustrated by the reactions of that clutch of youngsters who always seem to materialise out of thin air whenever a model aeroplane puts in an appearance. Normally, when you pull up for your first loop you can expect a "wow!" or at least a gasp or some other sign that they are suitably impressed. But, as I said, the Lazy Bee is different. When you pull a loop (or any other manouver) with the Bee, everybody reacts in just one way. They fall about laughing! It's great.
What Next?
With the Summer evenings beckoning, I'm looking forward to many more outings with the Lazy Bee. The only problem is that, now that the model is finished, those household jobs are beginning to work their way up the list. But wait, There are floats available for the Bee. Now I've always fancied a floatplane, and they say it will take off from snow too. It's never too early to start preparing for the winter, is it!
P.S. Needless to say, I did succumb to the lure of the floats. Initially these only got used to provide a bit of fun when our flying field flooded in the winter. The first viideo clip linked below shows one such outing, by which time the Bee was well over 10 years old and flying as well as ever. However, in 2011 our club was lucky enough to negotiate flying rights on a local reservoir and for the next couple of years the Bee hardly ever had its wheels on. Again the video clip page records some of these aquatic flying sessions. Now though (2014) I have a few more options for flying off the water and so the Bee is once again raising smiles at the flying field (see the flying shots at the end of the slideshow page, for example). Not bad for an eighteen year old model!
   
|
|