|
  
RCM&E Capiche 50

When Malcom Corbin's original Capiche design was published in RCM&E back in 2000, I was immediately taken with it. However, it was a bit small for what I had in mind and, although I contemplated scaling it up myself, I never quite got around to it. So, when the Capiche 50 appeared in the May 2003 edition of the magazine, there was no excuse.
Is it a plan? Is it a kit?
The Capiche is more than just a plan. There is website devoted to the model at www.islandhobbies.co.uk and you can order sets of laser cut parts as well as canopy, cowl and carbon fibre undercarriages made specifically for the model. In effect, you can put together a pretty complete kit if you wish. Because I was building for electric power, I wanted to be able to modify the construction where appropriate, so didn't go down the pre-cut parts route. Instead, I sat down with the plan and drew up a list of the balsa which I would need, trying to take account of likely modifications as I went along. As I studied the plan, it became clear that this model had been designed from the start with the 'semi-kit' approach in mind. Taking full advantage of the magic of Autocad, each part has been drawn with various notches and tabs so that the model can pretty well be assembled dry, then cyano run into all the joints. This is all very well if you are going to feed the drawings to a laser cutting machine, but is a bit of a pain when approaching a virgin sheet of timber with a balsa knife. Equally, there is extensive use of fretted out liteply, where balsa sheet would serve just as well. A good example is the fuselage sides - I could see no point in trying to find a large sheet of reasonably straight liteply, and fretting out all the holes and notches, when they can be cut from good quality 3/32 balsa sheet with two strokes of the knife. Having said all that, Malcolm Corbin's design approach is refreshingly light compared with many i.c. models so most of the changes I made were for constructional convenience rather than with the aim of shedding weight.
Bits & Pieces
I bought the recommended undercarriage at the Woodspring Wings show, where I also had a look around for a suitable commercial canopy. Having no luck with the latter, I gave up and ordered the 'official' item from Nexus. When it arrived, I was relieved to see that the canopy was of better quality than previous Nexus items I have bought. My relief was shortlived though when I found that the canopy was badly creased on one side. The reason for this was that, although the canopy had been well packed in paper straw, an engine cowl had been jammed into the box with it, which rather defeated the object. This was particularly frustrating as I hadn't ordered the cowl in the first place, intending to make a lighter one out of balsa. Since I suffer from the British desease of being reluctant to complain, I had a half-hearted attempt to smooth the canopy out with the heat gun then, having failed, tossed it and the offending cowl on one side and got on with the building.
In the Balance
The Capiche website mentioned above includes a complete building sequence. This proved to be a useful reference, but I chose to tackle the wing and tail surfaces first then just enough of the fuselage to join them together and hang the motor off the front. At this stage I like to do a first trial balance on the model to work out where the battery will have to go. This meant making my mind up as to which motor to use. By now, there was some discussion of electric versions on the Capiche website and it didn't take long to convince myself that the AXI 4120/14 would be an appropriate choice, running on 14 - 16 cells. This was duly ordered, with a radial mount set, and bolted to the firewall. With the skeletal model assembled and various bits of wood and radio equipment taped to it, I picked it up at the specified balance point. Nose heavy. No problem I thought, and moved the battery back a bit. After repeating this process several times, it became clear that the Capiche was going to be impossibly nose heavy unless the battery was moved back over the wing, extending into the cockpit area. Since my intended battery configuration was two 7-cell packs strapped together, and the Capiche has a one piece mid-moounted wing, this posed serious problems. After a bit of thought, I concluded that drastic measures were called for, reached for the hacksaw and sawed two inches off the nose.
|
|
|
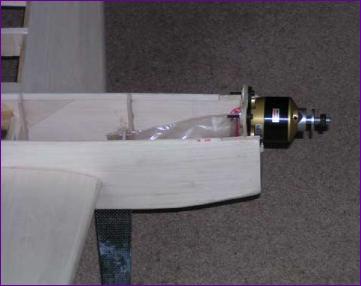
Part-built model ready for trial balancing...
|
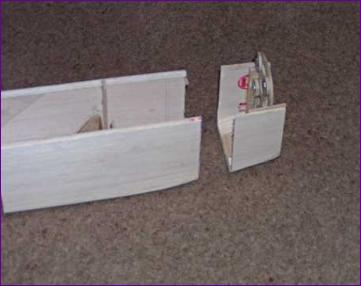
... and the resultant 'nose job'!
|
With the firewall re-attached to the shortened fuselage, a second attempt was made to balance the model. The battery was still threatening to intrude into the cockpit area and as I contemplated the situation my eyes fell on the distorted canopy - and I reached for the hacksaw again! By taking off the rear half of the canopy, I got rid of most of the distorted section and the front of the canopy moved back enough to make way for a suitably extended battery hatch. While the model sat there, I looked at the motor hanging out the front and contemplated how to build my balsa cowling. Then, hacksaw still in hand, I reached for that unloved, unwanted plastic cowling - and another large chunk of plastic bit the dust! Having thrown away the rear third of both canopy and cowling, things were beginning to look a lot better, and the rest of the model went together with no further drama.
 Finishing Off Finishing Off
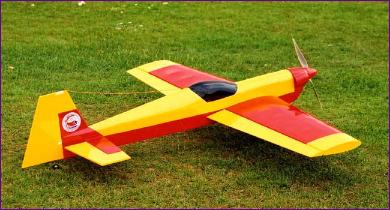
As usual with my models, the Capiche was covered in Profilm. The colour scheme was chosen for visibility more than beauty and was also influenced in no small way by the fact that I had a roll of red Profilm in stock. The less-than-perfect canopy was painted on the inside with black enamel and simply screwed into position, and the truncated cowling was brush painted with enamel. To encourage the air to pass around the motor rather than straight through those side cheeks, I fitted a baffle into the cowl and cut an air exit into the floor of the fuselage in the hope of sucking some of the air over the speed controller.
With everything installed, including 14 x 2400NiCd, the Capiche weighed in at 5lb 12oz. Looking back at my notes for that first trial balancing session, my estimate then was 5lb 13oz, so that aspect of things at least went pretty much to plan.
Flight (or not) Trials
I did a brief run up of the motor in the garden, just to check that things were running smoothly, then it was off to the flying field. Battery installed, ESC initialised then it was range check time. My assistant had barely gone eight paces before it was clear that something was wrong. Any attempt to run the motor and the control surfaces went wild. End of day one.
Back home, a repeat test in the garden confirmed tha lack of range. Swapping the rather elderly Futaba FM receiver first for a GWS dual conversion unit and then for a new Multiplex IPD did little to extend the range although, with the IPD Rx, instead of going wild, the control surfaces just stopped moving altogether. It was time for a more radical approach. I relocated the speed controller further forward and turned the flight pack round the other way, so that the battery and motor leads could be shortened considerably. This got all the heavy current carrying wires almost a foot clear of the receiver. It also meant making a new aperture for the ESC switch and revising the battery mounting somewhat. Unfortunately, all this produced little or no improvement in range. In desperation, I pulled the receiver aerial out of the tube in the fuselage and taped it to the top of the rudder - instant fix!
It is interesting to note that my other brushless powered model, the Chorus Gull, also suffers from the occasional glitch and here too attempts to increase wire separation seem to have had little effect. As well as having brushless power plants though, these models have one other thing in common - they both have servos mounted in the tail. I am now of the opinion that a large part of my range problem was down to proximity of the aerial to these servos or to the extension leads running along the fuselage to the receiver.
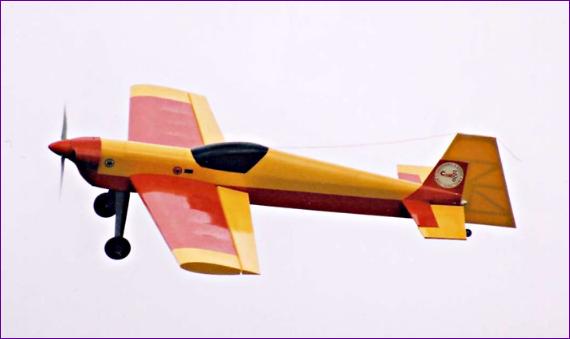
Anyway, with a now respectable, albeit not brilliant, range test performance, the Capiche at last took to the air. The first couple of flights confirmed that the recommended starting point for the cg was indeed somewhat conservative, so the battery was progressively moved backwards. Unfortunately, five minutes into the third flight there was a loud noise and the motor stopped. This marked the beginning of a frustrating five weeks during which John Emms of Puffin models, with whatever clues I could give him, tried to get to the bottom of the problem. In the end, the scientific approach failed and John supplied both a replacement motor and a different speed controller which, so far at least, are performing exactly as they should. I have encountered early failures with my two other brushless setups but both, once repaired, have since performed flawlessly, so I am hopeful that the problems with this Capiche are also now behind me.
 Impressions Impressions
My intial set up of 14 cells and a 13 x 6.5 APCe propeller is a little conservative compared to the 16 cells and 13 x 8 prop referred to on the Capiche website. However, even in this configuration the model is well powered for all conventional aerobatics, and handles like a thoroughbred. The thrust to weight ratio seems to be pretty near the calculated 1:1 - enough for really huge square loops but not quite capable of prop hanging. Perhaps when the power system has proved its reliability, I might experiment with those two extra cells. In the meantime, until my aerobatic flying improves, I will have to refer you one more time to that Capiche website for a full description of what the model is capable of.
|
|
|