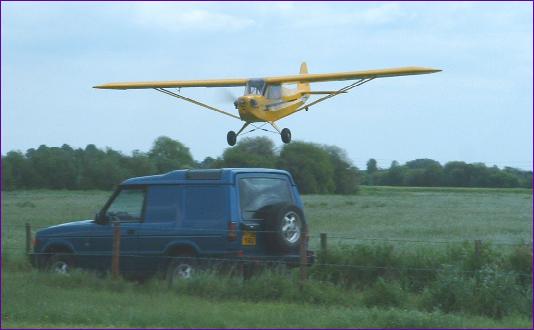
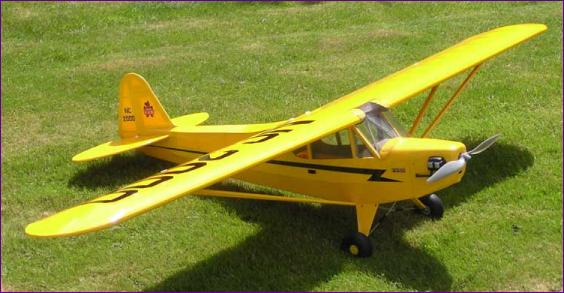
Piper Cub Review by Trevor Hewson
Having been impressed with the weight savings achieved when I converted most of my models to LiPo power in the Spring of 2006, I realised that conversion of i.c. ARTF models to electric flight was now possible without ending up with an overweight aircraft. At about that point, I came across my Astro 15 / Superbox powerplant which had been lying idle on the bench since selling my Sukhoij 26M two years earlier. This combo had given good service turning a 14 x 10 prop on 14 cells. Because of the gearing, the rpm was quite low at 5,300 and I had always thought it was more suited to a larger, slow flying model. The power level of just over 400 watts suggested that, for cruising rather than aerobatic performance, it should cope with a model up to about 8lb in weight. After looking around for a while, I bought the Thunder Tiger Piper J3 Cub. Being an ARTF, it was largely a matter of follow the instructions. All the major parts fitted together extremely well and the standard of construction and covering left little room for criticism. I have to say though that, being new to the ARTF game, I didn't find it a particularly rewarding experience. Just to give one example: When building a model myself, I would expect to spend a fair bit of time fettling hatch covers to fit neatly over the aileron servos. On the cub, the servo mounting blocks are already installed and the recess is formed to take the 1/16" ply hatch plate. The blocks to screw it onto are already there and the pushrod slot is pre-cut in the hatch. All of this is highly commendable and does save a good bit of work. However, when I came to fit the hatch plate, it was just a shade to big. Nothing that a quick stroke of the sanding block wouldn't fix - except that, in their quest to be extra helpful, the manufacturers supply the hatch plates pre-covered. Peeling back enough of the covering to sand the edge of the plate, whilst trying not to get any dust trapped under the covering took much longer than it would have taken to cut out and cover a new hatch plate - and then I would at least have had the satisfaction of having made something rather than feeling that I had been struggling not to spoil something that somebody else had made. Of course, whenever one converts an i.c. model to electric power, the two areas that require particular attention are the motor mounting and battery stowage. I always like to get the motor installed first so that I can work out where the battery has to go for c.g. purposes. Motor Mounting - Take 1
Battery Stowage I had already decided that I wanted to be able to change the battery without removing the wing so, to minimise the visual impact, a bottom hatch was the obvious solution. The Astro motor is very light and so it came as no great surprise to find that the flight battery would need to be located well forwards. So, a hatch was cut just behind the bottom edge of the cowl with a view to dropping the battery pack in vertically behind the firewall.
The supplied struts appear to be made of hardwood and are very heavy (6oz). The Cub's wing though seems to be very strongly built, so I can't believe that the struts are structural. The struts are attached by 3mm wood screws and the thought of finding those in the grass doesn't bear thinking about. After thinking about this for a while, I got out the hacksaw and slotted the strut attachment plates as shown in the picture. The screws now just need to be slackened half a turn rather than removed - much better!
With the 4s LiPo pack on board, the Cub came out at 7lb 12oz. This meant that I would be just over the magic 50watts/lb mark, in line with earlier calculations. However, the more I looked at it, the Cub did seem to be a big model for such a little motor. It therefore came as something of a relief when the Cub took to the air while I was still trying to straighten out the take-off run. The relief was replaced by intense concentration as I found the Cub to be significantly out of trim andremarkably sensitive, especially in pitch. Fortunately though, the wing is very forgiving and eventually I was able to get myself sorted out. It soon became clear though that the model was tail-heavy so the flight was cut short and a landing called. After something of a switchback approach, the touchdown was gentle enough and on the runway, so it was back home to contemplate the cg and trim problems. Balancing Act When I build my own models, I use the same wood in both wing panels and so have never had a lateral balance problem. However, a check of the Cub wing revealed the need for just over an ounce of lead in the right servo bay (I could see now way of stowing lead in the wingtip - another problem which would be better sorted out before covering rather than after!) A check of the fore/aft cg confirmed the model was indeed tail-heavy. I still don't know quite how I managed to get this so wrong! Okay, the flight pack didn't go as far forward as initially planned, but I had moved the Rx battery forwards and thought that I had restored the cg to its rightful place - clearly not! So, 3oz of lead bolted to the motor mount, and off we go again. Hot Stuff On the second outing, I had two flights with the Cub. The handling was much improved. There is still a need for a bit of right aileron trim, but it now steers much more positively and I was able to fly a few touch and go's without any great problem. However, after each flight, there was a rather nasty, acrid smell from the motor compartment, and it was clear that things were getting rather warm in there. Back home, a visual inspection revealed no obvious signs of distress from the motor or gearbox but I nonetheless opened up the air intakes, installed some baffles to guide the air closer to the motor body and spaced the rear edge of the cowl off the fuselage to improve the exit. All this though proved not to be enough: Six minutes into flight number four, the motor stopped. After a safe deadstick landing, the motor showed no inclination to run, and the evil smell was there again. This time the workshop inspections showed that the windings were the colour of charcoal rather than copper, so it appears that the heat got to the point where the insulating lacquer on the wire melted, eventually shorting the windings out. The Astro 15 had given good service in the Sukhoij (nearly 50 flights). However, the cooling arrangements were definitely better than in the Cub. Also, the duty cycle on the Sukhoij was perhaps more favourable and, of course, without the benefit of LiPo batteries, flight times were quite short. At the end of the day, in spite of the figures looking much the same in the two models, the Cub was too much for this motor.
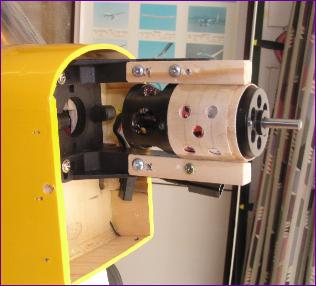
As luck would have it, at about this time I had decided to de-comission the Limbo Dancer. After 276 flights, this model was still going strong, but I found myself flying it less and less, and it was time to move on. So, out came the Ultra 1300/12 and I contemplated the challenge of mounting it in the Cub. This motor is direct drive and needs to be mounted right at the front of the cowl. Eventually I decided to roll a motor tube out of 1/32" ply, glue two 'mounting lugs' to it and utilise the i.c. mount supplied with the kit. As you can see from the picture, this is a totally different approach from that used for the Astro, but does seem to work okay.
With the Rx battery at the rear of the cabin (as suggested for the i.c. version) the c.g. was still a bit forward, but near enough for another test flight. In spite of being half a pound heavier, the model lifted off purposefully and flew well. After six minutes, the model was still climbing away positively from touch and go's, but I felt it was time to land and do a temperature check. I was surprised to find that there was barely any warmth to be felt through the prop driver and, more importantly, no noxious smells! Hopefully, I can now look forward now to progressively extending the flight times without worrying if I am pushing the powerplant beyond its limits. P.S. The Cub is now on its third powerplant! This time though the swap was necissitated by problems in another model (the MiG 3 fighter) rather than by any issues with the Cub. The latest setup is a Kontronik Fun 600-15 brushless motor, recently 'liberated' by the demise of my Logo 10 helicopter (see separate article on Motor Mounting for details). While I was about it, I also fitted the gyro out of the helicopter. This has helped the Cub to track straight on the ground, particularly at take off or during touch and go's. It also seems to help in flight, taming a tendency tighten its turns rather suddenly if provoked by a clumsy thumb on the rudder. |
||
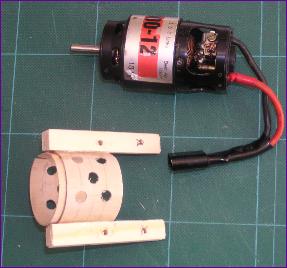
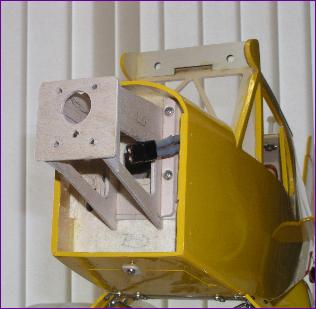 The instructions for mounting the i.c. motor give a firewall-to-propdriver measurement. Being a suspicious soul, I nonetheless offered up the cowl, pushed it back as far as it would go and inserted a ruler in through the front - and revised the quoted distance upwards. Not a lot, but enough to be really annoying if discovered afterwards!
 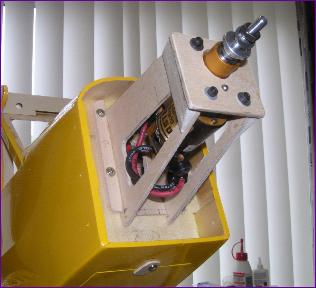 The firewall has four captive nuts pre-installed to take the supplied i.c. motor mount so I decided to design my mounting box to utilise these. The pictures shows the final arrangement which was pleasingly rigid.
  Unfortunately, the 3700mah LiPo battery proved to be just a shade to long. This proved to be quite a nuisance: Firstly, it meant that the battery would have to be angled, moving its centre of mass rearwards somewhat. Secondly, there is quite a complex structure of interlocking ply plates in the tank bay of the fuselage, which needed to be cut away. This again illustrates the frustrations of ARTF - cutting holes in formers after they are installed is bad enough; doing it in a fuselage which is already sheeted and covered makes it worse; and when the only access is through a 2in square hatch, one is into real keyhole surgery!
 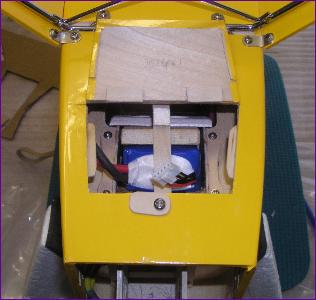 This then leads to the third complication: A battery tray cum box now has to be fabricated which can be inserted through the hatch, will locate firmly against the remains of the fuselage internal structure and can then be secured in position. A fourth complication was totally self-inflicted - I wanted the option to upgrade from a 4-cell to a 5-cell pack. By the time I had finished, I was convinced that building model ships in bottles would be child's play!
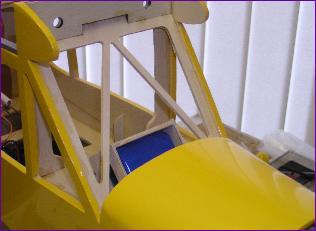 With the battery inserted, I turned the model over to give it a good shake to check that all was secure and found that, whilst everything seemed firm enough, the rear end of the battery was visible in the cockpit area of the cabin - see picture. So, another balsa bashing session was required to extend the coaming and re-locate the instrument panel. The instrument panel is supplied as a sticker, which now of course was the wrong shape. However, through the marvels of Photoshop, it was no problem to scan it and move the instruments around a bit. I took the opportunity to tone down the rather too glossy black background at the same time.
 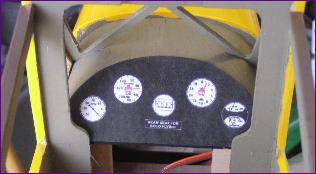 The end result, though not exactly true to scale, looks pleasantly plausible, at least to my eye.
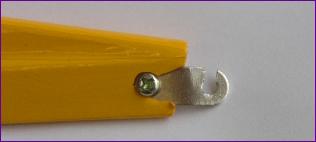
 The Ultra is an 18 volt motor, so now was the time to utilise that facility to add a fifth cell to the battery pack - at least that decision has proved worthwhile! The Ultra is also a much more substantial motor than the Astro and so it was no surprise to find that, with the extra cell on board, the Cub was now nose-heavy. Time to move that Rx battery again!